Our home….
It‘s the place we long to be when we’re away, and the place we’re most comfortable in when we’re not. It’s where we live, where we grow, where we boast, where we host, and where we wake up in the morning to eat our toast. It’s out kingdom, our castle, and our own little slice of the universe. That’s why it’s important for us to have everything just so—the sofa: this style, this color, this fabric, and along this wall; the coffee-table: front and center, the end-tables: one on either end; a bookshelf over there; knick-knacks over here, paddy-whacks over there, a picture of Grandma and Grandpa centered on that wall. And we drone, and we drone, and we drone, until we have it just the way we like it.
Then … in two, or three, or six, or eight months, we dismantle it, and we start over again—the sofa: move it over there along that wall; the coffee-table: still front and center, this end-table on this end, that end-table over there by the door with this lamp on it; and so on, and so on, and … it’s enough to drive a content husband crazy.
It doesn’t have to be like this—at least not every time. There is a relatively cheep, relatively easy solution on the market that will leave the basic layout of your room untouched while changing the whole feel from top to bottom. What is it? Ambience, of course. Changing something as simple as a ceiling light fixture is almost certain to breathe new life in to a room you’ve become a little too accustom to over time.
“No way!” you say? “That’s a job for an electrician.” And if you called and asked they’d probably agree with you, too, but then it’d be a simple job for them that they’d make quick easy money doing. That is why they do what it, after all. To make money. Chances are, though, if you can wire up a speaker, you can wire up a light fixture.
The first thing you’ll need to do is head off to the hardware store and shop. Everybody loves to shop, right? Our example, here, is a dome shaped fixture, but, since the basic design for most mounted fixtures are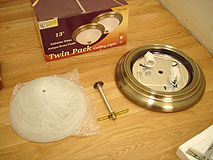 similar, it won’t make a difference. The exception to this: ceiling fans and heaver fixtures (chandeliers and the like) sometimes come with safety-cables that attach to the trusses (framework) of your house—in case they decided to become un-fixtures.
When you get your new purchase home, pull all the ingredients from the box, splay them out on a table, and take a good longish moment to look over the contents. Pick pieces up and examine them as you come across them in the directions. Try to get a feel for how things fit together—before its time to actually put things together.
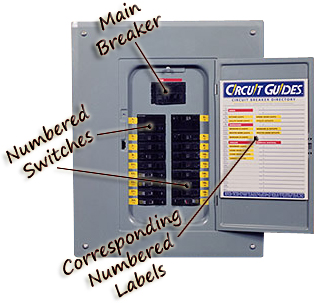
Once you feel like you’ve got a bit of an idea of what to expect, it’s time to get your hands dirty. First & Foremost, Turn Off The Power. You don’t have to shut down the entire house, just the juice that flows to the fixture you’re going to have your fingers in. To do this, turn on the light in question. It helps to have someone shouting weather or not the light remains on when you flip your breaker, but by running back and forth from the breaker-box to the room you’re working in, you can do the same thing. In most cases the breakers are labeled, but make sure! You don’t want to get your wires crossed on this one.
When you’ve found the right breaker and you’re sure you’ve severed the power, start taking the old fixture down. Because there are so many different styles of lights, you may find our instructions don’t quite fit what you’re looking at, but most fixtures are pretty basic and can be figured out by simple examination.
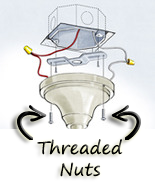
On either side of the base you should find a decorative threaded nut. Like I said, some fixtures differ (our dome, for example, has one big threaded rod through its shade), so don’t panic if yours doesn’t. This is only an explanation on how to take one of the more common apart. These nuts should be only finger tight, so you won’t have to run for that tool box just yet.
The entire light fixture should drop down into your hands once these nuts have been removed. Hold the fixture in one hand, and slip the nuts into your pocket with the other. Unless your fixture has one of the safety-cables spoke of earlier, the only thing that should be holding it from coming right off are three wires: one positive or live, one negative, and a ground. The ground can easily be distinguished by the fact that it has no coating, the positive will be white, the negative will be black, and the whole nest will be held together with wire-nuts.
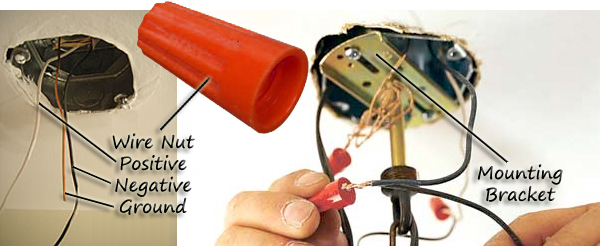
Twist the wire nuts off and stick them into your pocket, as well. The wires themselves will still be attached, but only because they’re twisted together. Untwist these, and the entire fixture will come away. Underneath you will find a small mounting bracket held on by two screws. This doesn’t necessarily need to be removed (it can be used instead of the one that came with your new fixture), but for our fixture, in particular, it’s a little easier to assemble while it’s not fastened to the electrical box still in your ceiling. These brackets generally require a flathead screwdriver to take off, so it’s time to go get that toolbox.
Exit The Old; Enter The New
Because there’s now there’s a bunch of unattractive electrical wires spewing from a gaping hole in your ceiling, we’ll move right into the installation of our dome fixture. Again there are many different styles, and again, if yours isn’t a dome like ours, don’t panic. Examine and follow the installation instructions that came with your particular model just as you would have if you were reading them here.
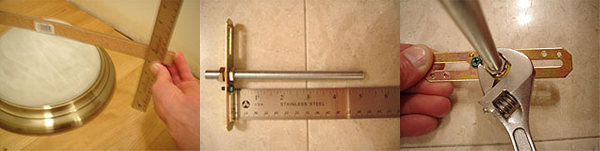
Measure the height of your dome from its base to its highest point. It’s probably easiest to do this from a flat surface as depicted in the image above, but as long as you get the measurement, you’re good. Once you’ve determined how high the dome is, set the threaded tube into the mounting bracket so that it’s roughly ¼ of an inch longer than the dome is high. This will allow the tube to run down through the inside of the dome, and protrude out of the bottom enough to catch the nut which holds the shade in place. When your tube-length is set, turn the nuts on either side of the bracket tight to lock it in place.
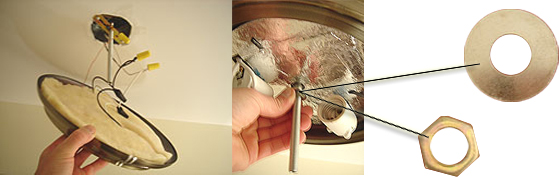
Screw the newly assembled bracket to electrical box, now—reversing the steps you used to remove the old one. Once done you should have a vertical threaded bar protruding downward from your ceiling. Holding the base of the fixture up with one hand, wrap the ground wire around the locking nut on the mounting bracket and thread it tight. Twist your wires back together (black with black; white with white), and dig those wire nuts back out of your pocket. Thread them back on over the exposed wire-ends, and give them a little tug to make sure their secure. Depending on the fixture you use and how your ground wire fastens, you may end up having an extra wire nut. It’s okay. As long as your ground is fastened, you’re good to go.

Side the base of your fixture up the threaded tube, now, making sure the wires are tucked into the box as you go. When the base is in place (snug against the ceiling), fasten it with the washer and nut to conclude the ugly part of the job. Leaving the switch in the off position for now, turn in a couple bulbs and head back to your breaker panel. It’s time to test your handy-work.
…
…
…
Back? Good. Now, keeping an eye on your new fixture, flip the switch and watch as your virgin light brightens your room for its first time. Celebrate this, but only briefly; you still have a few things to do up there, and you don’t want to have to try and navigate around hot bulbs.
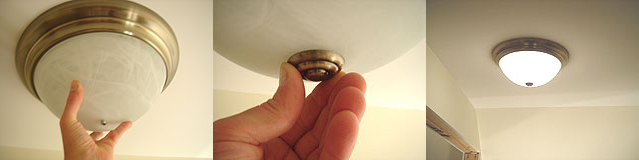
Climb back up, lift the shade into place, and thread the decorative nut on the end of the threaded tube to finish. Stand back now, flip on the switch, admire and pat yourself on the back. You did it.


